Damn Good Content To Grow Your Business In The Digital World
Insights, Ideas and Innovations from the brains of the Saucal NERDS.
Travelling and Working. How to work remotely, effectively.
05 Feb
2025-02-05T23:33:05-04:00
Travelling and working sure is bliss. You get the opportunity to learn new cultures, make some awesome connections and all in all, I think you get to enjoy life while you work! Travel and work, is however, not all fun and games and after a year of living in Europe (all over the place), here are my tips to make the transition from working in one location to working in many smoother.
Pre Planning.
-Choose a location that is not more then 6h away in time zones, unless you want to be a zombie and never see the light of day. Talk about work times and hours.
-Travel days add up. We all try and find the cheapest flights, but from time to time, go for the slightly more expensive flight day so you can travel on weekend for your shorter haul moves. This will give you more time to enjoy days you take off for the real experience.
Use the right technology.
-Slack
-Phone Data & Unlocked phones or a Nomad 4G box.
-Stay on top of a schedule using a PM software & Google Calendar & timezone.io
How to Setup the Canada Post WooCommerce Shipping Plugin
12 Jul
2016-07-12T17:05:03-04:00
The Canada Post WooCommerce plugin is one best way to get shipping rate details from Canada Post, Canada’s primary postal operator. It works as a premium shipping method that provides realtime shipping rates from Canada Post’s API.
To use this extension, two criteria are required to be satisfied. First, your store needs to use Canadian Dollars. Second, your server has SimpleXML installed.
Canada Post manages both, domestic and international parcels.
Go to WordPress Admin > Plugins > AddNew to upload the file that was downloaded with Choose File
Activate the extension
Canada Post – Getting Started
Link your Canada Post account first. Find the notification bar at the top of the admin screen, which will prompt you to Register/Connect.
The plugin recommend using pretty permalinks before connecting your Canada Post account to avoid an error caused by Canada Post. To know more about permalinks, check the Codex, and choose any option except default.
Click the Register/Connect button and you will be taken to Canada Post’s website.
Login to your account or register as a new user if you don’t have an account already. Once created, WooThemes will start getting shipping quotes from the API on your behalf.
Canada Post might also ask you to enter a credit card detail for few future automatic transactions, like monthly fees, transaction charges, etc. You can submit the details now or update it later when you sign into My Business Profile on the Canada Post Dashboard.
Upon completion, you will be sent automatically to the admin panel.
NB: To disconnect your account in the future, click the link at the top of the Settings page.
Canada Post – Setup & Configuration
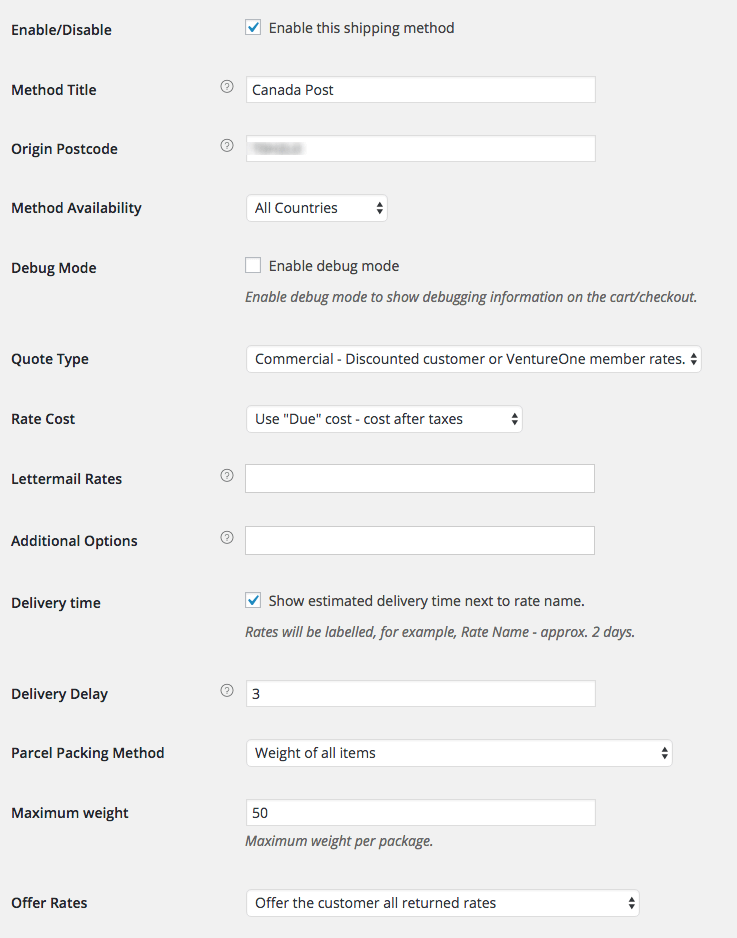
Setup the payment gateway by going to WooCommerce > Settings > Shipping > CanadaPost
Enable/Disable – Tick the checkbox to offer Canada Post as a shipping method.
Method Title – Give a short description. This will be shown to customers during checkout.
Origin Postcode – Give the postal code of the location from where shipping originates. The info will be also sent to the API to calculate rates.
Method Availability – Set it to All Countries or restrict it to certain countries as per your suitability. We recommend the former so that it is available to all your customers.
Debug Mode – Tick the checkbox if you want to log every request and response made in the Cart and Checkout pages. Useful for troubleshooting.
Quote Type – Commercial uses rates and discounts associated with your account. Counter uses normal rates that you will receive in person. Commercial is also used for VentureOne members.
Rate Cost – Two types: Base and Due. The former is base rate cost and latter is cost after taxes.
Lettermail – Select Standard and/or Registered rates from the dropdown. Lettermail isn’t a part of the Canada Post API and, therefore, rates are calculated by taking box packing and hard coded prices into account.
Additional Options – Select Coverage, Proof of Age, and/or Signature for parcels from the dropdown.
Delivery Time – Tick the checkbox to get delivery estimate (in days) displayed alongside rates. (Info pulled from the API).
Parcel Packing Method – Use the dropdown to select Pack individually. Weight of All items, or Pack with Weights and Dimensions (explained below).
Maximum weight – Define the maximum weight per package.
Offer Rates – Select All Rates (User Choice) or Cheapest Rate (Single) from the dropdown.
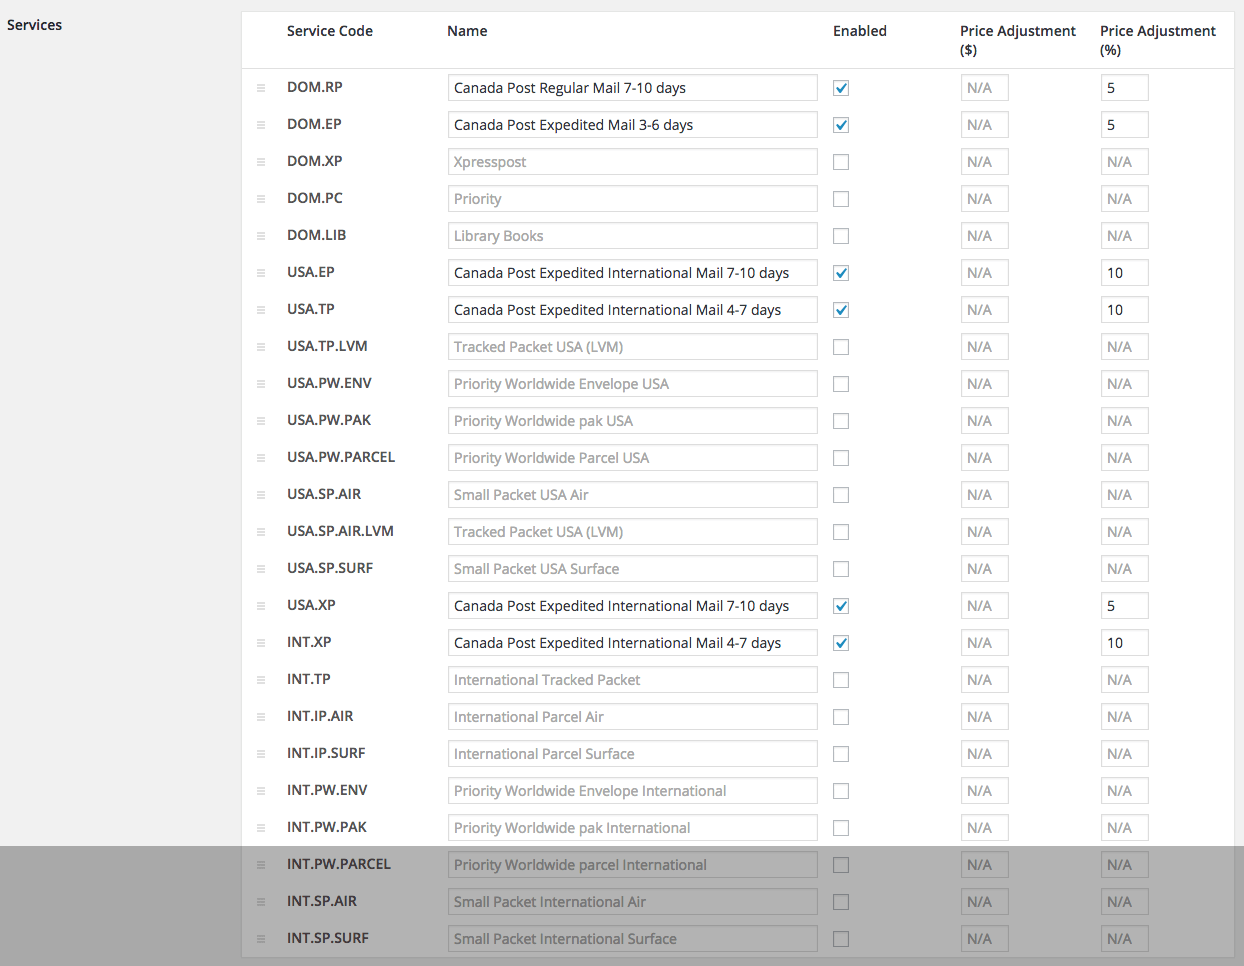
Services – Rename and reorder Canada Post shipping rates. Add price rates by percentage or fixed dollar amount. Adjustments are positive (surcharge/fee) or negative (discount).
Parcel Packing Methods
3 packing methods exist with Canada Post; each affects parcels sent to the API
Per Item – Items in your cart (non-virtual) are sent to the Canada Post API. The final cost involves quotes of all items combined.
Weight Based – The cart needs to be segregated into 30kg packages, details of which are sent to the API. Details include weight only, not dimensions.
Pack Into Boxes – Items are packed in pre-defined boxes and sent to the API. For more options, see Box Packing.
Box-Packing
Box packer lets you group items into packages wherein you define height, width, length, weight, and max-weight. Packing considers volume on a primary basis, but item size is also considered.
Setting Up Box Sizes
Set up box dimensions by clicking Add Box.
Outer dimensions refer to the parcel dimensions, an info which is passed to the API. Inner dimensions are used for packing. It must ensure that items fit within them. Box weight or in simple terms, weight of the box is the additional weight the cost of which is also included with shipping. Max weight is the maximum threshold of your box. This includes content weight and box weight.
How The Calculation Works?
The packer does the following:
Finds boxes that would fit the item needed to be packed, using HxWxD
Packs all items into boxes
Uses the largest box that would plausibly accommodate 100% of items; or uses highest percentage of packed box, return unpacked items, and then repeats the process.
Packs ‘unpackable’ items alone, using item dimensions.
Returns all packed boxes.
Customer Usage
When customers submit their address, they get quotes from 2 places:
Cart Page – using the shipping calculator
Checkout Page – by filling shipping and billing forms
Troubleshooting
Check if your production Canada Post account is connected or not?
Enable development mode, or turn on WP DEBUG to view debugging information on the cart page. This reveals the issue most of the time.
Check if product sizes and weights are set or not, since without them calculation cannot be performed.
Finally, ensure you have selected your store’s base country as Canada and base currency as Canadian Dollar (WooCommerce > Settings >General).
FAQs
Q: After attempting to authorize Canada Post, it brings me back to a page with a number 1 on the top left. A: You may need to update your permalink settings for WordPress to Pretty Permalinks.
Q: Why are my lookups timing out? A: Try opening Port 30000 for API communications.
Q: Error message in cart: Fatal error: Cannot use object of type WP_Error as array in ../woocommerce-shipping- canada-post/shipping- canada-post.php. A: If you are seeing this message, your server is unable to use the wp_remote_get() function. This can be verified using the Status Report:
In this case, we recommend you to contact your hosting company so they update your server.
Hope this blog simplifies the Canada post plugin. If you have any questions, let us know in the comments.
If you want to discuss more about the Canada post plugin with the team, or need help in configuring or customizing the plugin, please feel free to contact us.
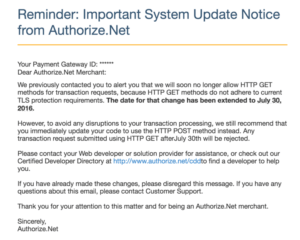
Recently users have been getting an mail from Authorize.Net informing them, that they would be ending support for any HTTP GET method for transaction requests; this is because HTTP GET methods no longer adhere to current TLS protection requirements. It’s a welcome change that increases security.
Previously Authorize.Net has strongly encouraged merchants to upgrade their connections to use TLS 1.2 exclusively and now this, adds a huge step towards making ecommerce more secure along with the web in it’s entirety. This will eventually make transactions over the web much safer than it is now.
Solution to HTTP GET changes
All the functionalities using HTTP GET methods for transaction requests has to be replaced by HTTP POST.
The team has been watching the transition closely and understands this can be challenging for many out there. Don’t slack off because July 30, 2016 is approaching quickly and can kill your eCommerce sales if forgotten.
If you want to discuss more about the change with the team, or need help replacing the plugins please feel free to contact us.
Why does my business or website need a landing page? Why the hell should I use one?
30 Aug
2015-08-30T03:58:31-04:00
Landing pages, capture pages, and squeeze pages all mean the same damn thing. Web marketing companies throw those terms around loosely and it confuses the crap out of their clients. For the sake of this article I’ll be calling it a landing page.
So, what’s a landing page? It’s a web page that works in conjunction with your website. Its only goal is to make a conversion: to get the user to perform an action. Landing pages need to follow a set of rules to be most effective.
A landing page has no menu bar. Why? If you put your menu at the top of the page, then you give your users an ‘out.’ All you want them to do is fill out the form and hit ‘send.’
A landing page also has no footer, with the exception of social sharing links.
Your landing page header should have the same message as the link text that brought the user to the page. For example, if the link under my YouTube video says, ‘Download My Facebook Cover Image Template,’ your landing page header should say the same thing.
The body text should be concise, describing what the user is filling out. The shorter, the better.
Add a small image.
Add 3-5 bullet points on the benefits the user gets from filling out the form.
The title of the form should use powerful words that make the user excited about filling out the form. In the example above, ‘Download My Facebook Cover Image Template’ is hardly compelling copy!
Create a call-to-action (CTA) button. For the above example, I would re-iterate ‘Download Now.’
Create a thank-you page or redirect the user to a pertinent page on your site. For example, a specific blog post or your process page.
Repetition is not a bad thing here. Just reword the action you want people to perform.
Here’s an example of this layout:
A good landing page follows the above rules to ensure that the message is congruent from the traffic source up until the thank-you page. In short, it will increase your leads and make you more money. In contrast, a bad landing page is when someone clicks on a link — say our ‘Download My Facebook Cover Image Template’ example — and gets a form that says, ‘Contact Sales.’ All this gets you is a disappointed user that will never return to your site again.
Saucal can help you make amazing landing pages. Clients that listen to us get up to 50 hot leads a month! Get started now!
How do I make more money with my website, and what the f*%k is a conversion?
05 May
2015-05-05T19:15:14-04:00
Simply put, a conversion is an action you want a visitor to your website to complete. Examples include: contact sales, book an appointment, sign up, buy now, and many more. It’s really an action you make a user perform to bring you more money. There are several ways to do this; however, many people go about converting visitors all wrong.
Increasing site traffic is useless if there’s nowhere for people to convert. Having a contact page as the only page that converts a visitor is backwards! So how do you do it?
It’s simple! Build a funnel. The overarching concept is as follows. I’ll elaborate on each of these steps in future posts.
The top of your funnel is education. Get the right kind of traffic by becoming a thought leader in your field. This can be accomplished by blogging or creating an education center, and just showing your users that you know what you’re talking about.
The middle of your funnel is talking about yourself. Show why you’re a better competitor. Do this by showing your awards and comparing your processes to others in the field.
The bottom of your funnel is your hard sell. This is where you say, “Buy now.”
So, how do you create this funnel? I’ll show you!
First, look at your homepage. Before you scroll down, is there something that prompts your visitor to do something — without a bunch of distractions or clutter? In the business, it’s known as a call-to-action above the fold. More specifically, it shouldn’t prompt someone to buy right now, but direct people to learn more about you, your product, or your process.
Second, is your message clear? If there are, say, three messages above the fold — before you scroll down — then your message is muddied. So, if you have a big ol’ slider, get rid of it! If you can’t explain what you do in 15 words or less in big-ass text, then get a copywriter to fix it.
Here’s an example of a homepage that converts well. This client is gaining a tonne of traction online, and is busier then ever.
Here’s a site that looks great, but has no funnel leading to conversion. Avoid this at all costs!
So you have written a blog about “XYZ”. Now you want people to read it, but nobody did. How do you get more traffic there? Here are some simple tips for you engage a larger audience.
2. After you have written your blog, use the title of the blog in your social media push. These should be targeted keywords.
3. For every blog post, there should be Tweets, Facebook Posts, etc. for the next 3 days. 20 to 30 Tweets should be the norm.
4. If certain Tweets generate no traffic, try and re-tweet them at different times of the day.
5. You need analytics. If you’re not using Hubspot, I would recommend it. However, you can use something like bit.ly (for free) to shorten the URL to your blog, while giving you some analytics on different clicks.
EDIT (October 1, 2015): The CTA on this site was removed, as we migrated to a new design.